

Every Hockey Shot Explained
Hockey in 60 ·
A good hockey shot begins before the puck leaves the stick.
A detailed guide to technique power accuracy and choosing the right finish
A good hockey shot begins before the puck leaves the stick. It begins with the skater finding space, seeing the goaltender and preparing a release that can happen before a defender closes the lane. A spectacular slap shot is one solution. A quiet backhand, a short snap shot or a small deflection can be a better one.
This guide explains the major ways players shoot and finish in ice hockey. It covers how the hands, skates, body and stick work together; what makes the puck rise, spin and travel quickly; and how a shooter chooses between power, speed of release and deception. It also explains one-timers, tips, rebounds, wraparounds and the lacrosse-style goal, then provides practice progressions and a guide to common mistakes.
The central idea is straightforward: a useful shot must fit the available opportunity. Maximum speed matters when the player has room to create it. Close to goal, getting the puck away before the opening disappears often matters more. Technique should give a player several ways to solve those different problems.
Understanding the names
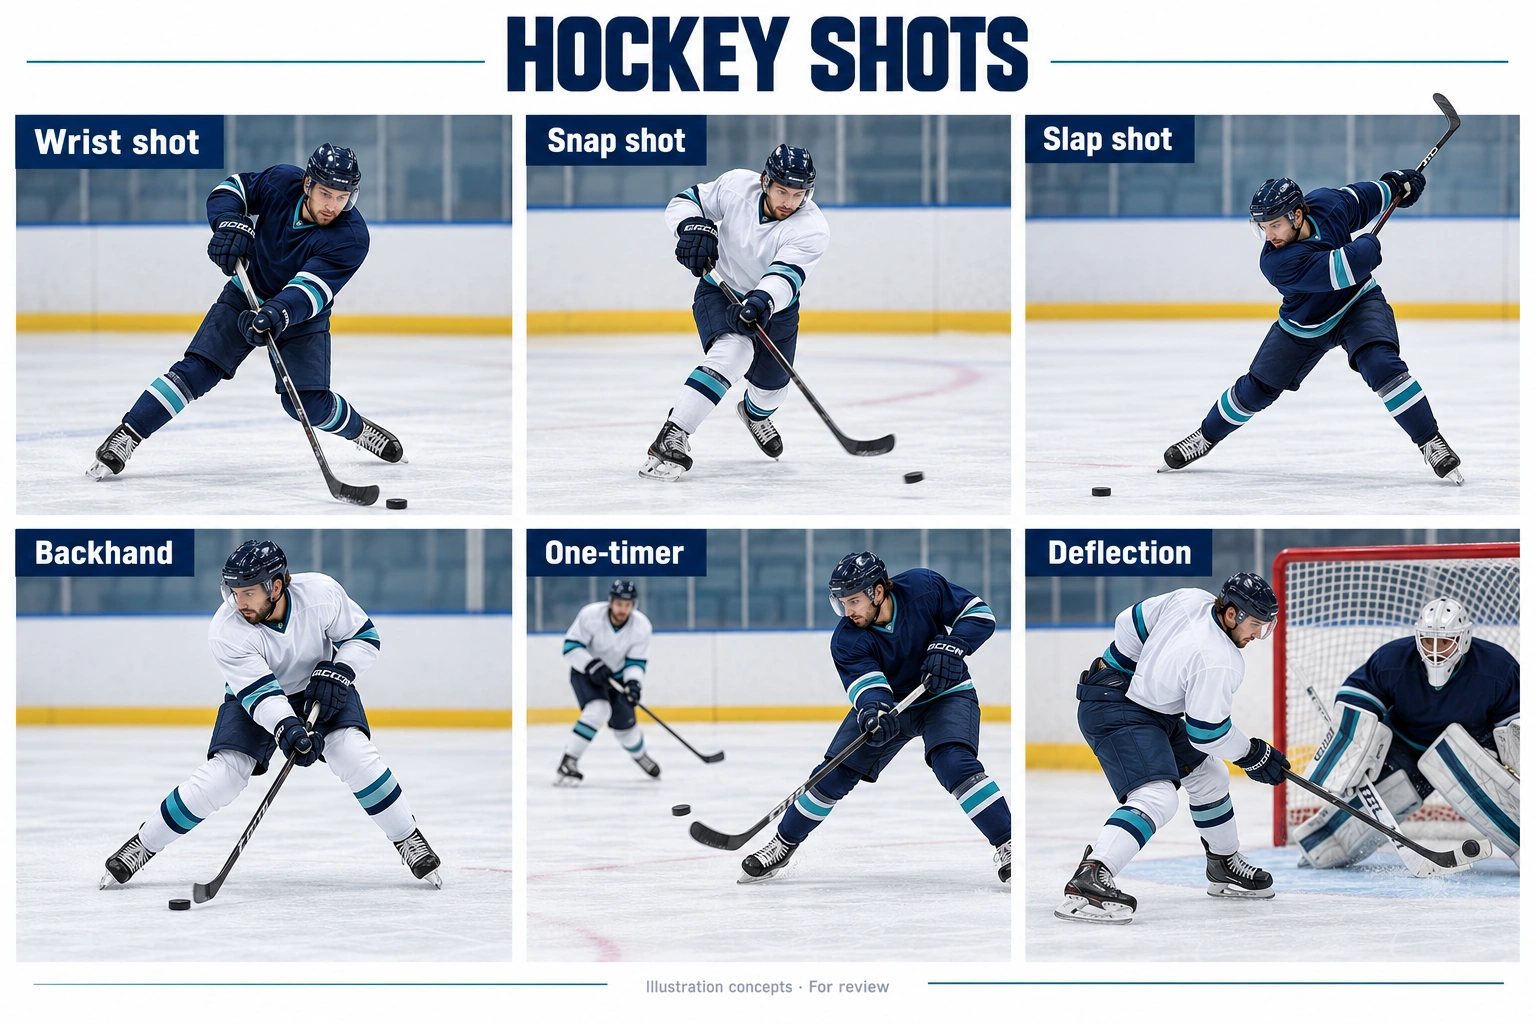
Hockey terminology mixes several kinds of description. A wrist shot describes a release mechanism. A one-timer describes when the player shoots a pass. A wraparound describes the route to the goal. A top-corner finish describes the target. One scoring play can therefore be a backhand, a one-timer and a close-range finish at the same time.
There is no single universally agreed list containing every hockey shot. Coaches may classify the same compact forehand release as a snap shot, a quick wrist shot or a hybrid. What matters is recognizing how much preparation it requires, how the blade interacts with the puck and which opportunities it can exploit. Hockey Canada includes wrist shots, backhands, flip shots, snap shots, slap shots, tips and deflections, and dekes within its basic scoring framework. A deke creates a shooting opportunity rather than defining one particular release. [1]
| Shot family | Examples | Main purpose |
|---|---|---|
| Wrist | Sweeping forehand release | Controlled acceleration and placement |
| Snap | Compact forehand action | Quick release with little preparation |
| Slap and half slap | Striking action with a backswing | Power or a faster compact variation |
| Backhand | Reverse blade face | Finish without a forehand transfer |
| One timer | Immediate shot of a pass | Use the opening before recovery |
| Flip and chip | Short upward contact | Clear a nearby obstacle |
| Tip and deflection | Redirect an incoming puck | Change the path near goal |
| Rebound and jam | Finish an available loose puck | Exploit a short second chance |
| Wraparound | Carry from behind the goal | Reach a post before the seal |
| Lacrosse style | Carry the puck on the blade | Specialized finish from a rare opening |
The distinctions in the table are practical teaching categories. They are not rigid boundaries. A player can shorten a slap shot, lengthen a snap shot or blend a drag into a wrist release. Slow-motion video is usually more informative than arguing over the label.
The foundations shared by effective shots
Handedness and hand position
A left-shot player normally places the right hand at the top of the shaft and the left hand lower down. The forehand blade faces the puck on the player's left side. A right-shot player reverses those positions. Shooting handedness does not necessarily match writing handedness. Players should develop a comfortable, functional grip rather than assume that their dominant everyday hand must occupy a particular position.
The top hand helps steer the shaft and control blade orientation. The lower hand supplies leverage and pressure, with both hands contributing to acceleration. Describing the top hand as steering and the bottom hand as powering is useful initially, but neither hand works alone. Their coordinated movement creates the blade path and controls the release.
Grip spacing changes with the task. A lower bottom hand can provide useful leverage for a slap shot. A more compact grip can make puck handling and a quick release easier. There is no exact separation that suits every height, stick length and shot. The player needs enough separation to load the stick without becoming locked in a position that prevents receiving a pass or changing direction.
Keep the top hand able to move away from the torso. When it is trapped against the hip, the player has less room to pull, rotate the shaft or adjust the blade. This is one reason a shooter who looks strong can still produce a weak or erratic release: the body is blocking the hands' useful movement.
Balance and the skating base
Bent ankles, knees and hips create a position from which the player can apply force and remain balanced. The exact angles vary with speed and the shot. A player who stands upright may struggle to press through the stick. A player who crouches excessively may lose vision or become slow to adjust.
The skates provide the connection to the ice. Edges resist unwanted sliding and help the player direct force. During a conventional stationary forehand teaching progression, weight commonly moves from the rear leg toward the front leg. That gives a beginner a clear way to coordinate the body and the stick. It should not become a requirement that every game shot must contain an obvious rear-to-front step.
Players also shoot while gliding, turning, crossing over and balancing mainly on one skate. Advanced releases can use either foot as the principal support. Coaches sometimes call these inside-foot and outside-foot shots; the language can be confusing, so it is helpful to identify the supporting skate explicitly during instruction. For a left shot, for example, practise separate releases with more support through the left skate and through the right skate.
Whole body coordination
The shot is a coordinated movement involving the legs, pelvis, trunk, shoulders, arms and hands. Calling it a wrist shot does not mean that the wrists provide all its power. Larger body segments help accelerate the stick, while the hands refine how that acceleration reaches the puck.
A study of 10 elite and 10 recreational players found relationships between trunk rotation and wrist-shot speed in both stationary and skating conditions. It supports the importance of body involvement, but it does not establish one ideal rotation angle for every player or game situation. A longer preparation may produce more speed in an open drill while giving a defender too much time in a game. [2]
The useful coaching question is whether the player can connect the movement without losing balance, vision or release control. More rotation is not automatically better. A shooter facing an immediate block may need a compact movement; another player with open ice can use a fuller preparation.
Looking before releasing
A shooter needs information about the goal, the defender and nearby teammates. Looking up only after settling the puck can make a promising opportunity disappear. Build the habit of scanning before the pass arrives, then updating the picture as possession changes.
This does not mean staring continuously at the top corner while ignoring the puck. Skilled players alternate attention and use peripheral information. For a developing player, the first goal is to stop needing to watch every inch of puck travel. Comfortable puck control creates more opportunities to read the game.
How a stick helps create power
A hockey stick is an elastic structure. Applied forces bend the shaft and blade; as they recover, some of the stored elastic energy can contribute to puck acceleration. The player supplies the energy. The stick temporarily stores and returns part of it rather than creating power independently.
The basic spring relationship, energy equals one half times stiffness times deflection squared, helps explain the principle. A hockey stick is more complicated than a simple spring: its geometry, material layers, blade construction and loading direction all matter. The formula is a teaching model, not a calculator that can predict a player's shot from the flex number on the shaft.
During a slap shot, the blade commonly contacts the ice before the puck. That contact helps load the stick while the player's hands and body continue the swing. A short forehand release can also bend the shaft through downward and forward pressure. A huge backswing is therefore not required to use elastic recoil.
Research has investigated stick recoil, shaft stiffness and the relationship between player motion and stick performance. Those studies examine particular players and test conditions. They do not justify the simple claim that the stiffest stick always shoots hardest, or that the softest stick always gives the quickest release. [3,4]
A stick that is difficult for a player to load can encourage exaggerated movements. A very flexible setup may feel poorly controlled to another player. Length matters too: cutting a shaft changes its effective bending behaviour and the player's leverage. Test a stick while receiving, handling and shooting from game-like positions, rather than selecting it only from one radar attempt.
Blade curve affects how the puck sits on the forehand and backhand. Lie describes the relationship between shaft and blade; it influences how the blade meets the ice in a player's stance. Neither curve nor lie guarantees a particular finish. Equipment should support a repeatable movement, and a player should understand a change before blaming every miss on technique.
Figure 1 Loading and recovery of a flexible stick
The wrist shot
Basic definition: A wrist shot accelerates the puck with a sweeping blade action and a coordinated release of the hands.
The traditional wrist shot is an excellent starting point because the player can feel the puck on the blade for a relatively long part of the forward action. That contact allows controlled acceleration and makes it useful for learning direction, height and spin.
Begin with the puck on the forehand side in a position the arms can reach without stretching away from the body. In a conventional teaching movement, the puck begins behind or beside the body and travels forward as the skater transfers pressure toward the target. The lower hand pushes through the shaft while the top hand pulls and controls its rotation. The trunk contributes as the hands move through the release.
Many players feel the puck progress along the blade toward the toe during the sweep. That rolling interaction can help impart spin. It should not become a rule that every wrist shot must start at the extreme heel or touch every centimetre of the blade. Starting positions vary with curve, puck location and available time. [5]
The blade's orientation and movement while it is still contacting the puck determine the launch. A slightly open blade can help send the puck upward, while a more closed presentation can keep it lower. The puck must also leave cleanly. Trying to lift it with a scooping movement can produce a weak fluttering shot if the player loses forward acceleration.
The follow-through offers useful feedback about the movement. Finishing toward the intended line can help a developing player maintain direction. However, the stick cannot change the puck's flight after contact has ended. Saying that a high follow-through makes the puck rise is shorthand: the important conditions occur at release, not afterward.
A wrist shot is useful when the puck is under control and there is enough time to sweep without being checked. It works from the slot, on a rush, after a lateral pass or when a player changes the shooting angle. Its main limitation is that a long visible preparation gives the goaltender and defender time to react.
To shorten it, begin with the puck already in a usable shooting position. Reduce unnecessary stick handling, preserve the connection between the body and hands, and release before the goalie finishes adjusting. A quick wrist shot can be far more effective than a carefully arranged maximum-effort attempt.
The snap shot
Basic definition: A snap shot uses a short, sharp blade action to release the puck with little visible preparation.
The snap shot occupies the practical space between a sweeping wrist shot and a larger striking action. The blade may separate slightly from the puck before re-engaging it. Downward pressure loads the stick, and the hands accelerate through a compact release. The precise amount of separation differs among players and among coaching definitions. [6]
Start with the puck within reach beside or slightly in front of the body. Create room for the top hand and bring pressure through the lower hand. The blade then drives through the puck as the shaft unloads and the hands control its face. Avoid turning the action into an isolated chopping motion with straight legs and a rigid torso.
The short movement makes the snap shot useful when a pass arrives in traffic, when a defender's stick is approaching or when a goalie is moving. A player can keep skating and shoot without first arranging both skates into a textbook stationary stance. This ability makes the release difficult to read.
A snap shot is not necessarily a low-powered shot. Skilled players can generate substantial speed in a small movement. However, beginners should avoid trying to copy the sound or apparent violence of an elite release. Begin with clean contact and a stable puck, then add speed while retaining control.
One common problem is pressing down too early and trapping the blade against the surface. Another is swiping across the puck without sending enough force toward the target. Video from the side and from behind the shooting line can reveal whether the player is loading the stick usefully or simply dragging it.
The shot is especially valuable near the slot, on rush entries and after a puck pull that opens a lane. Its compact action also makes it a strong foundation for shooting off either supporting skate. In practice, compare an immediate release against one extra stick handle. The difference in available time is often more important than the small difference in radar speed.
Figure 2 Three common forehand release actions
The slap shot
Basic definition: A slap shot accelerates the stick through a backswing and downswing, normally using ice contact before puck contact to help load the shaft.
The slap shot is the most visibly forceful release. Its longer swing can create high blade speed and substantial stick loading. It is useful from the point, from a prepared shooting position and on passes that arrive in a suitable one-timer location.
Set the puck where the blade can reach it after contacting the ice. Begin with a balanced base and a hand spacing that provides control through the swing. Rotate the body and bring the stick back without losing awareness of nearby players. On the downswing, drive through the ice just behind the puck, continue through contact and allow the body to rotate toward the target. [7]
There is no universal number of inches behind the puck at which every player should strike the ice. Stick length, swing path, flex and puck position change the contact point. Hitting too far back can waste energy and disrupt the blade's approach. Hitting the puck first may reduce useful loading or produce an inconsistent strike. A coach can help locate a productive contact zone for the individual.
The puck's flight depends on the blade's speed, orientation and contact. A slap shot can stay low, rise sharply or flutter if contact is poor. The impressive sound of ice contact does not prove an effective shot. Judge whether it reaches the intended area while the player remains balanced and ready for the next play.
A large backswing has a cost. It announces the attempt and gives a defender time to close the lane. From the blue line, a maximum-effort shot into a shin pad can turn possession into an opposing rush. Getting a controlled puck through the first layer may create more offence than attempting the hardest possible blast.
Use the full slap shot when there is time, a suitable lane and a purpose for the extra speed. For a screen or tip play, height and placement may be more important. Shooting hard through a teammate's upper body is not a useful substitute for choosing a workable lane.
The half slap shot
A half slap shot reduces the backswing while retaining a striking action and some stick loading. It sacrifices some preparation distance to release sooner. It is useful for a defender walking the blue line, a player receiving an imperfect pass or a shooter whose full windup would invite a block.
The name does not mean that the stick must stop at exactly half the height of a full swing. The adjustment is functional. The player uses only as much preparation as the situation permits. A compact slap shot can also make it easier to keep the puck in a lower corridor for a teammate's deflection.
The backhand
Basic definition: A backhand shot releases the puck from the reverse face of the blade.
The backhand lets a player finish without first moving the puck to the forehand. That can save a decisive fraction of a second near the crease or during a breakaway. It also changes the release position and can be harder for the goalie to anticipate from the player's body alignment.
Begin with the puck on the backhand side within a comfortable reach. Keep the hands free of the torso and use a coordinated sweep or short lifting action. The lower hand and top hand still work together, but their relationship to the blade face has changed. The player needs to learn how much the backhand face is open at contact rather than simply copy the forehand movement in reverse.
A curved blade presents a different surface on the backhand. Depending on the curve and contact point, the puck may feel less securely cupped than on the forehand. That makes clean contact and blade control especially valuable. A beginner often tries to lift too aggressively and sends the puck upward without enough forward speed.
For a low backhand, drive through the puck with a controlled blade face. For a rising finish, allow an upward component while maintaining forward acceleration. Close to the net, very little lift may be needed to clear a pad. Shooting as high as possible can send an excellent chance over the crossbar.
A strong progression begins with short, accurate backhand passes and low shots. Add controlled height, then motion and pressure. Practice should include receiving directly on the backhand and releasing without an unnecessary forehand touch. Hockey Canada's introductory backhand teaching emphasizes grip, stance and a comfortable shooting line. [8]
The backhand is difficult for many players because they practise it less and receive less forgiving feedback from the blade. It is not inherently unreliable. A player who can finish from both faces forces the defender and goaltender to respect more possibilities.
The one timer
Basic definition: A one-timer shoots an incoming pass without first stopping and settling it.
A one-timer is a timing skill layered onto a release. It may use a slap shot, a short snap action, a wrist-style redirection or a backhand. The player coordinates the arriving puck with the moving blade so that contact sends it toward the target before the goalie can complete a lateral adjustment.
Preparation begins before the pass. Present a useful target, organize the feet and hands, and read the puck's speed and line. The pass needs to arrive where the player can reach it without lunging or becoming trapped. A shooter who prepares only after the pass is already beside the stick has very little margin for error.
The passing player is part of the shot. A firm, flat pass to the right spot can make a compact finish possible. A pass behind the receiver may require a recovery touch; a bobbling puck may call for a simpler controlled attempt. Forcing a full slap-shot one-timer on every delivery is a poor use of the skill.
An off-wing setup often helps expose the forehand blade toward the middle. For example, a right-shot player on the left side can receive across the body into a forehand shooting position. The benefit depends on spacing and passing direction; simply standing on the opposite wing does not create an open shot.
Practice with slow, predictable passes first. Match the swing to the arrival instead of starting the largest possible windup. Progress to different speeds and locations, then add a defender or a decision to pass. A good drill rewards recognizing a poor shooting opportunity as well as executing a good one.
Catch and release
A catch-and-release shot includes a controlling touch before the shot. It is therefore different from a strict one-timer, although the entire action may be very quick. The first touch absorbs or redirects the pass into a usable release position, and the next action sends it toward goal.
This option can be more reliable when the pass is difficult or the shooter needs to move around a stick. The aim is to make the control touch purposeful. If it merely stops the puck dead and forces a complete reset, the goalie may gain time to become square.
Changing the release point
Basic definition: A release-point change moves the puck to create a new shooting lane before the shot leaves the blade.
The goaltender aligns to the puck, not simply the centre of the shooter's chest. A defender also positions a stick and body relative to the expected lane. Moving the puck laterally can make both players adjust. A small change can matter when it places the blade beyond the defender's reach or forces the goalie to update the angle.
A common move begins with the puck farther from the body, then pulls it inward before a quick release. Another pushes it outward. A toe drag can draw the puck around an extended stick, followed immediately by a snap or wrist release. The shot still needs a stable launch; a dramatic drag that leaves the puck under the skates has solved one problem and created another.
Figure 3 Changing the puck position changes the shooting line
The deception works best when the early movement resembles another plausible action. A player may show a pass, change the hands slightly and shoot. Looking toward a teammate can encourage a defender to lean toward the passing lane, but vision must still support accurate puck control. Deception should create a useful advantage, not replace awareness.
A pull toward the body can also change the stick's angle and the supporting foot. That is why release-point work should be practised while skating. A stationary drill may teach the hands but omit the balance required to reproduce it in motion.
Do not assume every puck movement improves the chance. A clear lane can close during an unnecessary drag. The first question is whether the player already has a good shot. The second is whether moving the puck creates enough benefit to justify the time it takes.
Flip shots chips and short lifts
Basic definition: A flip shot lifts the puck with a controlled blade action, often over a nearby obstacle or a goaltender's pad.
A flip does not need the speed of a long-range shot. Close to goal, the problem may be getting the puck over a pad before the goalie seals the opening. The player uses the blade face and a short upward-forward movement to create the needed height.
The puck's position matters. If it is too far ahead, the player may reach under it without control. If it is trapped close to the skates, there may be no room for a clean lift. Work from short distances and learn to send the puck over a low target while keeping it below a sensible upper limit.
A chip is a short contact that sends the puck into space. It might be a scoring attempt, a pass or a way around a defender. The same small lifting skill can serve all three purposes. Its value comes from selecting the right trajectory rather than always trying to create maximum height.
At the crease, a soft controlled lift may beat a hard shot driven into the pad. Farther out, a slow loft often gives the goalie ample time. Shot selection still depends on distance, the goalie's position and whether the puck must clear an obstacle.
Tips and deflections
Basic definition: A tip or deflection changes the direction of a puck already travelling toward or near the goal.
The player at the net does not need to create all the puck's speed. The incoming shot supplies much of it. A small change in direction late in the flight can force the goalie to respond to a new path with little time remaining.
Present the blade where the puck can be contacted and use its face to influence the redirection. A large swing is often unnecessary. A stable, deliberately angled blade can be more effective than an uncontrolled swipe. The player must track the puck while maintaining legal position against the defender.
The original shooter has a responsibility too. A teammate's blade is a target. A shot placed through a reachable corridor gives the net-front player a realistic opportunity; a wild puck at head height does not. Shooting for a stick is different from shooting randomly and hoping a teammate can rescue it.
A deflection can change height as well as horizontal direction. The puck may rise, drop or flutter after contact. Spin and flight can be disrupted, making the result less predictable than a clean release. The attraction is the late change, although the attacking team still needs control over where and how the contact is attempted.
In NHL rules, the crossbar is the relevant height limit when an attacking player's stick contacts a puck that subsequently enters the goal. This differs from the shoulder-height rule used for playing a puck with a high stick in general play. The height of contact matters, rather than where the stick finishes afterward. These examples refer to the 2025–26 NHL rulebook; other competitions and later editions should be checked separately. [9]
The slap pass
A slap pass resembles a shot but is directed toward a teammate's stick for a redirection. It can disguise the intended target and exploit a player near the crease or farther across the slot. The passer must prioritize a controllable line and suitable pace.
The receiving player should know the intended play. Sending an unexpected maximum-speed puck through a teammate is not a coordinated slap pass. Start with simple stationary redirections, then introduce movement and disguise while keeping the receiving target clear.
Rebounds and jam plays
Basic definition: A rebound finish attacks a puck that remains available after the first shot is stopped or deflected.
The first requirement is anticipation. A player who watches the initial shot without moving may be late to the rebound. Arrive with the stick ready and a body position that permits a legal second attempt. The rebound may demand a forehand, backhand, short lift or immediate poke rather than the player's favourite prepared release.
Near the goal, the available time is extremely short. A compact push can score while a full backswing allows the pad to arrive. The player often needs to identify the exposed area before making contact rather than simply hammer the puck back into the same covered space.
A jam play tries to push an available puck through a small opening around the pads or post. It depends on recognizing whether the puck is loose and the play remains live. Continue only within the rules and stop when the whistle ends play. The skill is close control under pressure, not striking indiscriminately at the goalie.
Rebound placement is not entirely controllable. A shooter may aim low toward a pad to create a second chance, but the goalie can absorb, steer or cover the puck. If no teammate can reach the rebound, a deliberate pad shot may give away a better direct opportunity. Think about who is arriving and which side of the crease is available.
A useful practice pairs a shooter with a second attacker. The first player chooses a shot that fits the situation; the second reads the actual rebound. Do not let the rebound player start every repetition already knowing exactly where the puck will go. Reading the bounce is part of the skill.
The wraparound
Basic definition: A wraparound carries the puck from behind the goal to a post and attempts to finish before the goalie seals that side.
The net hides part of the puck's route and forces the goalie to track from one side to the other. The attacker needs enough speed to threaten the post while keeping the puck within reach. The blade and hands must bring the puck around the outside of the goal frame and into a legal scoring path.
Puck control and skating radius are connected. A wide turn may preserve speed but give the goalie time. A tight turn can shorten the route but become difficult if the player loses an edge or lets the puck strike the back of the net. Practice the route slowly before adding speed.
At the post, the player may push the puck along the ice, lift it over a pad or move it across the crease if the opening is blocked. A wraparound attempt should not become automatic simply because the attacker has reached the back of the goal. A teammate in front may have the better opportunity.
Defenders can interrupt the hands or close the route, while modern goaltenders work to seal the post. The attacker should read the goalie's arrival rather than assume that speed alone guarantees space. A change of direction behind the goal can be useful if it creates a real opening and possession remains protected.
Banks sharp angles and unusual finishes
A bank attempt deliberately uses a surface to redirect the puck. The boards may return a puck to a useful area, while a shot from a sharp angle may be aimed to glance off the goalie and enter the net. These are different plays with different risks.
At a sharp angle, much of the net is hidden behind the goalie and the near post. A shooter may identify a small gap around the shoulder, pad or skate. The same attempt can also rebound harmlessly into the corner. A purposeful bank requires a visible route; shooting at a covered goalie and hoping is a lower-information decision.
Board rebounds depend on speed, impact angle, board construction and puck behaviour. The simple equal-angle reflection taught in basic geometry is only an approximation for a real rink. Do not assume a bank pass will return exactly as a billiard-ball diagram predicts.
A sharp-angle shot may still be sensible when a goalie is moving off the post or looking elsewhere. If the goalie is set and a teammate is open in front, a pass can create a better finish. Evaluate the picture rather than treating the difficulty of a goal as proof that it was always the best choice.
The lacrosse style goal
The lacrosse-style goal, often called the Michigan, involves lifting and carrying the puck on the blade before placing or sweeping it toward the goal, commonly from behind the net. It requires unusual blade control and a suitable opportunity.
The player first controls the puck on the blade, then moves the stick while keeping the puck supported. That demands coordination between blade angle, acceleration and body position. It is a difficult skill to reproduce while skating and under pressure, even if a player can scoop the puck during a quiet practice.
Its legality depends on the rules and the details of the play, including stick height and how the puck enters the goal. It should not be described as automatically legal everywhere. The NHL rulebook addresses lacrosse-style carrying within its high-stick provisions. Learn the applicable rules before incorporating it into competition. [9]
For most developing players, a dependable forehand and backhand will solve more situations. The advanced finish can be an interesting addition after those foundations. Its value is an extra route to goal when the goalie and defenders leave the right space.
Breakaways and shootout choices
A breakaway gives the attacker more control over the approach but also exposes every preparation cue to the goaltender. The player can shoot early, change angle, slow down or deke. There is no single move that defeats every goalie.
An early shot can exploit a goalie who is still adjusting depth or angle. Moving closer can make a small opening easier to reach, but it also reduces the visible target as the goalie challenges and narrows the angle. The attacker must decide before running out of room.
A deke invites the goalie to commit and then moves the puck to another finish. The move needs a believable initial threat. If the puck is too far from a shooting position, the goalie may wait rather than react. A useful fake preserves the possibility of a real shot until the next movement changes the picture.
Practice at least a direct shot, a forehand-to-backhand option and a backhand-to-forehand option. Read the goalie rather than performing a memorized sequence regardless of the response. In a shootout or penalty shot, separate competition rules govern the attempt; ordinary practice success does not settle the legality of every move.
What makes the puck spin rise and wobble
When the blade applies force away from the puck's centre, it can create torque and spin as well as forward motion. A clean release often produces rotation about an axis close to perpendicular to the puck's flat faces. That rotation helps the puck maintain its orientation, much as a spinning disc resists some changes in attitude.
Spin should not be confused with a guarantee of straight flight. A puck can leave tilted, wobble or tumble. Blade contact, puck orientation and the surface all affect the launch. After a tip, its new direction and spin may be quite different from those of the original shot.
A hockey puck is not a baseball. It is misleading to promise that a particular wrist roll creates a predictable curveball-style break. Aerodynamic forces can influence its flight, but the shooter normally aims to control launch direction, height and stability rather than manufacture a standardized breaking trajectory.
The initial upward component of velocity makes a rising shot climb. Gravity acts downward throughout the flight. A puck does not continue rising because the shooter keeps the stick high after release. Air resistance, orientation and rotation complicate the real path, especially for fluttering pucks.
On the ice, friction and irregularities can slow or disturb a sliding puck. An airborne puck encounters a different set of influences. This is one reason an off-ice shooting surface cannot reproduce every detail of on-ice contact, even when it is useful for learning hand coordination.
For practical diagnosis, watch whether the puck leaves cleanly, whether the blade is open or closed at contact and whether misses repeat in the same direction. Do not try to repair every unstable shot by adding more wrist roll. The problem may begin with puck position, blade contact or a body movement that crosses the intended line.
Shot speed and the time available to a goalie
Shot speed is important, but the useful clock starts before release. A goalie can read the pass, the shooter's body and the stick preparation. A fast puck following a long obvious windup can be easier to prepare for than a slower puck released from behind a screen.
There is no single dependable speed for a wrist shot, snap shot, backhand or slap shot. Age, strength, skill, sex, equipment, skating speed and measurement method all matter. Labels also overlap. Giving every category a narrow universal speed range would imply a precision the categories do not support.
A player's own measurements can still be valuable. Use the same radar setup, puck, surface and distance. Compare several clean attempts and record accuracy as well as peak speed. A personal best that misses the target is useful information about power, but it does not establish a more effective game shot.
For an illustrative 30-foot journey, a puck travelling at a constant 70 mph would take about 0.292 seconds. At 90 mph it would take about 0.227 seconds, and at 110 mph about 0.186 seconds. These are original distance-divided-by-speed calculations, not measured reaction times. They ignore drag, the puck's detailed path and any loss of speed.
The difference between 70 and 90 mph over that distance is about 0.065 seconds. A shooter who removes a visible settling touch may affect the overall timing substantially without increasing puck speed. A lateral pass can also make the goalie move before the shot, while a screen can delay the moment the puck becomes visible.
Goaltending therefore involves anticipation and positioning as well as reaction. A goalie who is square, balanced and tracking the puck has already solved much of the problem before the final fraction of a second. The attack tries to disturb one or more of those conditions.
Figure 4 Illustrative puck travel times
Famous hardest shot measurements
Zdeno Chara recorded 108.8 mph in the 2012 NHL All-Star Skills Competition. Martin Frk recorded 109.2 mph at the 2020 AHL All-Star Skills Competition. These are separate competition records and should be identified by their setting rather than merged into an unqualified claim about the fastest shot under every possible condition. [10,11]
The NHL's historical skills guide records Al Iafrate at 96.0 mph in 1990 and 105.2 mph in 1993, followed by Chara's 108.8 mph in 2012. Those selected marks illustrate the history of the event; they do not show a smooth annual increase or establish that the average game shot improved by the same amount. [10]
Changes in stick construction, player preparation and technique help explain interest in modern shooting performance, but a clean historical comparison requires consistent measurement. Competition runups, shot locations, radar systems and selection of participants can differ. A modern in-game tracking maximum should not be treated as directly interchangeable with a skills-event attempt.
The more relevant development for many players is the ability to create useful speed with less preparation. A compact release while skating or under pressure can change scoring opportunities even if the headline maximum does not rise. For a coach, repeatable speed within an accurate, quick release is often a better training target than a single record attempt.
Accuracy placement and reading the goalie
Accuracy means sending the puck to the intended place. Scoring requires choosing a place that is available. A player can accurately hit the centre of a perfectly positioned goalie and still make a poor attacking decision.
The shooter's location changes the visible opening. From the middle, more of the goal is available. From a sharp angle, the near post and goalie hide much of it. The puck's actual release point matters, so a lateral movement of the blade can alter the picture even when the player's skates barely move.
High shots can exploit space above the pads or around the shoulders. Low shots can reach gaps, beat a moving pad or create rebounds. Neither is universally better. A shot just above the ice may be ideal when the goalie is moving; a high attempt may be useful when the lower net is sealed. Learn controlled height rather than treating every low shot as a mistake.
The five-hole is the opening between the goalie's legs. It changes as the goalie moves and closes into a save. The attacker needs to identify when it is accessible. Repeatedly aiming there after the pads are sealed does not become a better decision merely because the puck is on target.
A screen obstructs the goalie's view. The shooter should recognize when the goalie is struggling to see and deliver a puck through a suitable lane. The screening teammate must maintain legal position and avoid interference. A shot that never clears the defender in front has not used the screen effectively.
The goalie also reads eyes, shoulders and blade preparation. A player who can pass or shoot from similar initial positions creates uncertainty. This does not require an elaborate trick. Receiving in a balanced stance with the puck ready can preserve both options longer than stopping, standing up and then deciding what to do.
Choosing shots in common game situations
On a rush
Speed changes the relationship between the shooter, defender and goalie. A quick shot through a developing lane may be available before the defender establishes position. Another rush may offer a lateral pass that produces a much larger opening.
Carry the puck where it can be released without a long rearrangement. If the defender extends a stick, a small pull or push may open a lane. Avoid skating directly into the block while concentrating only on the goalie. The first obstacle is often the defender's body or blade.
From the point
A defender shooting from the blue line faces distance and traffic. The first job is frequently to get the puck beyond the nearest blocker. Walking laterally, changing the release point or using a half slap shot can help preserve a lane.
Decide whether the purpose is a direct attempt, a tip or a rebound. Those objectives can call for different placement. A low controlled shot toward an available stick may be more useful than a high hard shot that misses and exits the zone. The risk of a block also depends on the team's support behind the puck.
In the slot
The slot often offers a direct route to goal, but pressure arrives quickly. Prepare before receiving and decide whether the pass can be shot immediately. A snap shot, quick wrist shot or one-timer can use the opening before the goalie and defender recover.
Do not insist on perfect placement of both feet. A balanced release from the available support may be the only realistic option. Practising several puck locations helps the player avoid needing the same ideal setup every time.
On a power play
The extra attacker can create passing options that move the defending unit and goalie. A one-timer threat can force respect even when the eventual shot comes from elsewhere. The shooter should remain ready while the puck is on another teammate's stick.
Possession does not justify every available point shot. A clear shooting lane with a screen may be valuable; a fully set blocker may be a reason to move the puck again. The goal is to create an advantage before the penalty expires while managing the risk of a clear or counterattack.
Which shot is hardest and which is most reliable
Difficulty depends on what is being measured. A full-power slap-shot one-timer requires demanding timing against a moving puck. A rising backhand can challenge blade control. The lacrosse-style finish requires specialized puck support and coordination. Each can be difficult for a different reason.
For a beginner, a controlled wrist shot is often a useful starting point because its longer contact provides understandable feedback. For a player near the crease, the most reliable choice may be a short backhand that avoids an extra transfer. Reliability belongs to the player and situation rather than permanently to one label.
A useful repertoire starts with a forehand release, a backhand release and the ability to shoot a pass without excessive settling. Add a compact snap action, controlled elevation and rebound finishes. Develop a slap shot and advanced releases as they become useful, while continuing to practise the simpler skills.
There is no equivalent to a baseball pitcher's fixed number of pitches. Hockey players continually adapt a smaller set of release principles to changing puck positions and movement. An effective shooter needs options across both blade faces, different feet and different amounts of available time.
A practice progression that transfers to games
Establish clean contact
Begin at a distance where the player can reach the intended target without straining. Use a stationary puck and a clear shooting lane. Practise low forehands, then controlled height, followed by backhands. The early goal is to understand blade contact and direction.
Change one variable at a time. If the player is learning to lift the puck, do not simultaneously demand maximum power and a tiny top-corner target. Record whether attempts are clean, where they go and whether balance is maintained. A few thoughtful repetitions can reveal more than a large pile of hurried shots.
Add movement and the pass
Progress to a slow glide, then shots after turns and changes of direction. Practise from both supporting skates and from several puck positions. The purpose is to prevent a stationary stance from becoming a requirement for shooting.
Introduce passes to the forehand and backhand. Begin with a control touch, then reduce the delay where possible. Add one-timers only at speeds that allow useful timing practice. Deliberately vary some deliveries so the player learns when a catch-and-release is preferable.
Add perception and decisions
A coach or partner can indicate a target shortly before release, or present a passing option that appears and disappears. Add a passive defender to create a lane problem, then increase pressure gradually. Let the player pass or retain possession when there is no suitable shot.
An exercise that requires shooting on every repetition teaches a different decision from a game. Include situations where the correct response is a pass. Reward a player who recognizes a blocked lane rather than treating that choice as a failed repetition.
Measure the right outcomes
Track target hits, release time and successful choices alongside puck speed. For one-timers, count clean contacts and useful placement. For rebounds, assess how quickly the player finds and controls the loose puck. Match the measure to the skill being trained.
Keep comparisons fair. If today's drill uses a closer target or easier passes, a higher success rate may reflect the task rather than improvement. Short video clips from consistent angles can help distinguish a repeatable change from a good isolated attempt.
Use off ice work thoughtfully
A shooting pad can make extra repetitions practical. It can help develop hand coordination, contact awareness and target control. Its friction and puck behaviour may differ from ice, while shoes provide a different base from skates.
Return regularly to on-ice practice to test what transfers. Do not assume a shot built while standing in shoes will automatically appear during a turn on skates. Use appropriate pucks, a secure target and a lane clear of other people; the setup should permit concentration on the actual skill.
For children, adapt the stick and task to the player. Hockey Canada's pathway emphasizes broad motor and technical development before later specialization and advanced deception. Early success should come from manageable challenges, not copying an adult's maximum-power motion. [1]
Diagnosing common shooting problems
| Observed pattern | What to investigate | A useful next test |
|---|---|---|
| Repeatedly too high | Blade face and launch angle | Reduce height while preserving forward speed |
| Weak fluttering lift | Puck position and contact | Use shorter controlled lifts close to goal |
| Hard but inaccurate | Effort and release control | Reduce effort then rebuild speed |
| Blocked repeatedly | Lane and preparation time | Add a pass option or change release point |
| Slow after receiving | Readiness and first touch | Prepare before arrival and shorten settling |
| Good alone poor in games | Pressure and perception | Add a defender and a genuine decision |
A miss is evidence, not a complete diagnosis. Several different faults can produce the same result. Compare several attempts and change one part of the task before deciding what to correct.
If the puck repeatedly rises too high, inspect the blade during contact and the initial launch. If it stays low despite an intended lift, inspect puck position and whether the blade can create an upward component. Do not begin by forcing the follow-through into an extreme position.
If a shot is fast but rarely reaches the target, reduce the effort enough to recover control. Then rebuild speed gradually. A player who becomes rigid while trying to shoot harder may lose the sequence that previously made the shot effective.
If the player looks good alone but struggles in games, examine preparation and perception. The missing skill may be receiving under pressure or identifying a lane, rather than a defective wrist action. Game transfer requires practising the information that precedes the release.
Watching hockey with a shooters eye
On the next scoring play, begin watching before the shot. Notice where the pass comes from and whether the goalie must move. Look at the shooter's hands and puck position. Was there a large preparation, a quick touch or no settling touch at all?
Then watch the lane. A small puck pull may place the release outside a defender's stick. A teammate may hide the puck from the goalie. A seemingly ordinary low shot may be intended for a blade near the crease. The final contact often makes more sense when the preceding movement is visible.
After the release, notice what the attacker does next. A shooter who stays available can collect a rebound or keep possession. The shot is one part of the attacking sequence, and its value includes the opportunities that follow.
The best shooting repertoire gives a player control over direction, height, timing and release location. Power expands the options, while preparation and judgment make those options usable. A player becomes more dangerous by learning to deliver the right puck through the right opening while that opening still exists.
Sources and research notes
Research checked October 28 2026. This Hockeyin60 Original combines primary coaching resources, published biomechanics research and original explanations and practice examples. Numbered references support the cited claims. Diagram movements are simplified and do not prescribe exact joint angles. The speed chart is an original constant-speed calculation, not measured player data. Historical radar marks are identified by competition. Rule examples use the cited 2025 to 2026 NHL edition rather than asserting a universal rule for every league.
[1] Hockey Canada Shooting and Scoring Skill. Read source
[2] Robbins and colleagues 2021 The relationship between trunk rotation and shot speed when performing ice hockey wrist shots. Read source
[3] Research paper 2006 Recoil effect of the ice hockey stick during a slap shot. Read source
[4] Research paper 2014 Field Measurements of Ice Hockey Stick Performance and Player Motion. Read source
[5] Ice Hockey Systems and Dwayne Blais Three Part Wrist Shot Progression. Read source
[6] Hockey Canada NCCP Shooting and Scoring On Ice Plan 2023. Read source
[7] Ontario Minor Hockey Association Slap Shot Technique. Read source
[8] Hockey Canada Backhand Shooting Teaching Resource. Read source
[9] National Hockey League Official Rules 2025 to 2026 Rules 78 and 80. Read source
[10] National Hockey League 2023 All Star Guide Hardest Shot History. Read source
[11] American Hockey League 2020 Skills Competition Recap. Read source